An Introduction to WordPress Acceptance Testing with Codeception

I want to give a basic introduction into Acceptance Testing which helps to find out whether you implemented all project requirements.
In this blog post, I want to tell you something about WordPress Acceptance Testing with Codeception. I will explain what Acceptance Testing is and how you set it up in WordPress. Moreover, we will create an Acceptance Test.
What is Acceptance Testing?
In the wide range of types of testing, Acceptance Testing could be placed in the opposite side of Unit Testing. While in Unit Testing you test a single unit of code, in Acceptance Testing you test the final product from the customer’s point of view.

Acceptance Tests vary from just clicking a button to performing a whole purchase in an e-commerce site.
One key feature about Acceptance Tests is that non-technical people can write them. That means from product managers to clients, anyone involved in the project can describe in plain words what they’re doing and what they expect to happen. This is, at its core, what Acceptance Testing is about. Acceptance Tests are tests to determine if project requirements have been met.
Speaking of testing in general, there is one big rule about it, the more you test, the more robust and less error prone your product will be. Especially Acceptance Tests shine on product releases where you need to ensure that what you deliver will work as expected. Another great use case are regression tests, there you need to ensure that an issue that was already fixed will not arise in the future.
Setting up the testing environment
In order to run the tests we need an easy to setup testing environment. We are going to use Docker which provides ready to use images of WordPress, Codeception and Selenium Chrome.
For the purpose of this article I created a Github repository that includes a basic testing environment. I also created a quick video that shows the whole setup process: https://vimeo.com/245350458
In the video I’m using Docker on a Mac via Docker Toolbox, the process should be similar for Windows. In Linux it’s slightly different because you install Docker in your machine directly instead of using it via a Virtual Machine.
A detail in the repo is that the Dockerfile contains a command that grants write permissions to www-data group inside WordPress container. I had to add this to prevent permission issues when uploading images or installing plugins. This may vary depending on your machine or how you are using Docker.
As you can see at the end of the video, I’m doing a database backup. That way the database will be reset before every test. You can configure this behaviour in tests/acceptance.suite.yml Db module.
Codeception Modules
In my opinion, two of the most useful Codeception modules are WebDriver and Db. WebDriver is especially handy if your tests have JavaScript involved . It allows you to run JavaScript code directly in the tests via executeJS. Db is especially very useful when your tests need to look at or perform operations in the database.
Writing Tests
A common approach for writing tests is to manually perform the actions and write down all the steps and results in a document. Another usual approach is writing user stories or writing tests based on, for example, support tickets. Whatever approach you choose: It’s really important that you defined the tests clearly before you start coding.
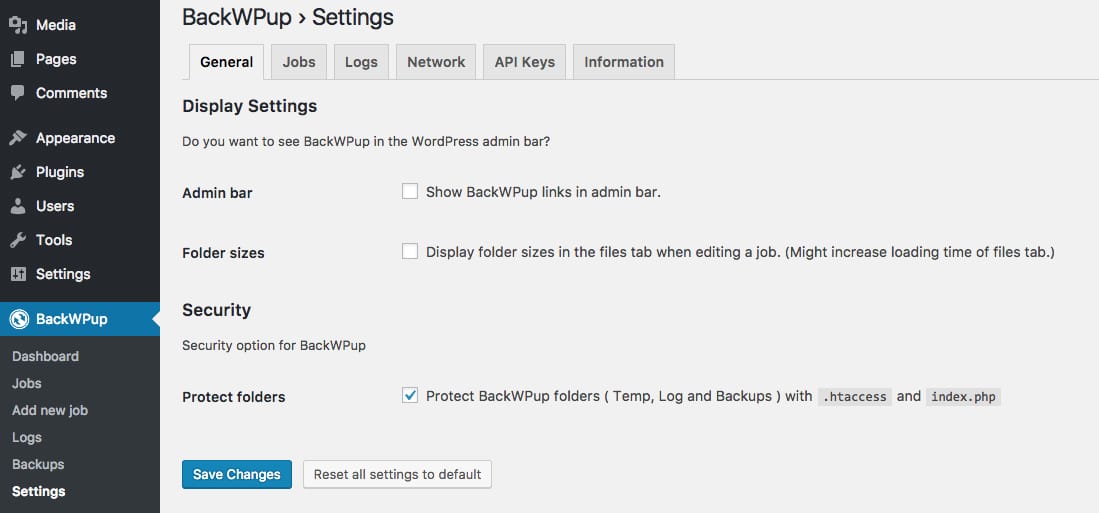
As an example, we are going to create a simple Acceptance Test for the BackWPup plugin. We’ll test whether the General Settings page works as expected. To do so we need to install and activate the plugin. After that we create a database backup and copy it to tests/_data/dump.sql
Creating a Test
Codeception supports 3 test formats. In this example we are going to use the Cest format which looks like a PHP class. It includes run functions before and after, like other testing frameworks.
To create the file, run this command:
docker-compose run --rm codecept generate:cest acceptance SettingsPage
The above command will create a new file in tests/acceptance/SettingsPageCest.php
As you can see in the following code, we are using _before function to login to WordPress admin before executing the general_settings_page function which checks that the fields in the General Settings page have been saved correctly:
<?php

class SettingsPageCest {

    public function _before( AcceptanceTester $I ) {

        $I->amOnPage( '/wp-login.php' );
        $I->wait( 1 );
        $I->fillField( [ 'name' => 'log' ], 'admin' );
        $I->fillField( [ 'name' => 'pwd' ], 'password' );
        $I->click( '#wp-submit' );
    }

    public function general_settings_page( AcceptanceTester $I ) {

        $I->amOnPage('/wp-admin/admin.php?page=backwpupsettings');
        $I->see('Display Settings', 'h3');

        $I->dontSeeCheckboxIsChecked('#showadminbarmenu');
        $I->dontSeeCheckboxIsChecked('#showfoldersize');
        $I->seeCheckboxIsChecked('#protectfolders');

        $I->checkOption('#showadminbarmenu');
        $I->checkOption('#showfoldersize');
        $I->uncheckOption('#protectfolders');
        $I->click('Save Changes');

        $I->seeCheckboxIsChecked('#showadminbarmenu');
        $I->seeCheckboxIsChecked('#showfoldersize');
        $I->dontSeeCheckboxIsChecked('#protectfolders');
    }
}
To run the whole test simply use:
docker-compose run --rm codecept run
To run an individual test use:
docker-compose run --rm codecept run acceptance some-folder/SomeClassCest:some_function
Conclusion
This article is just a short introduction into the topic of WordPress Acceptance Testing. We only scratched the surface when talking about how to setup a testing environment to start playing with it. I hope you enjoyed this article. Hopefully you learned something new that you can apply to your own projects. After all, that was my intention when I wrote this article. 🙂